


MorganTyre
-
Posts
291 -
Joined
-
Last visited
Content Type
Profiles
Forums
Events
Gallery
Posts posted by MorganTyre
-
-
Wow, glad to see someone else give it a go. Very nice. I like the small craft-type projects. Very likely no one will ever see my tobacco pouch but it sits there in my pocket looking stained and weathered and makes me feel the part just that much more. I also want to try my hand at the hand grenades in the following link. From what I'm reading there it's just paper mache and yet documentably period. My only hold up is that, not being a black-powder-er I don't have ready access to musket balls to split so I've been keeping an eye out for something suitable.
http://www.bruzelius.info/Nautica/Weaponry...1691)_p196.html
-
I think that's actually a Goeblins film (french film school). Most of the animation they have out there is great. Its worth doing a youtube search for "Goeblins"
-
I believe he was talking about the simplicity pattern.
-
Looking like a class A misdemeanor here in texas. It falls under the definition of "club" which is looking as a whole like it's right out. Funny, considering every you can walk into any local walmart, heb, or bait stand and buy a fish bat. Oh well, lesson learned - know you local laws!
-
You remind me of a young Charles Manson with that wonderful gleem in yer Eye there! When you sew, by chance to you whisper under yer breath, "It rubs the lotion on it's skin, or else it gets the hose again"

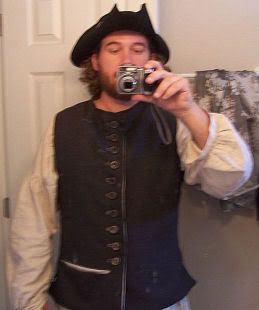
Ha! I wouldn't have seen it if you didn't mention it but now I can't help it. Not a bad gleem in the eye for a bloodthirsty pirate though! Great kit there, I'm envious. I like the bag there. Was that a project or something bought? You just need to get a little wear into those slops to knock out the bright bright white. What material is your vest there. Wool?
-
Nice work, mate, just one thing: that blackjack is considered a weapon in most states. As such it would be considered a concealed weapon if in the pocket of your slops. Just a heads up.
Ahh, thank you thank you. That saved some embarassment. Got to look into the local laws.
-
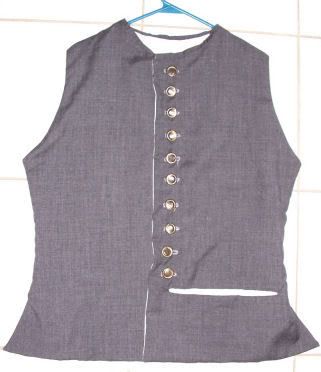
Ok, two photographs of the nearly done short jacket (vest). All that's left is a flap for the pocket and even that I'm sort of debating.
-
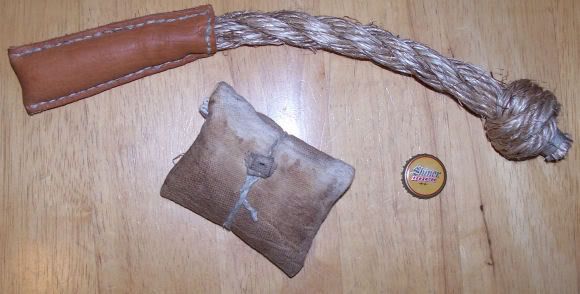
Below are two simple cheapie projects I made. The beer cap is for size reference.
One is a tobacco pouch sewn up quickly from a scrap of canvas. The toggle button is also (obviously) made from the same piece. The tie is a piece of hemp beading cord. To get that stained and weathered look I actually put some old (the company I bought it from years ago is no longer in business) dried out and forgotten about pipe tobacco in it then good and wet then gave it a couple of squeezes. Two days of drying in the sun later and what you see is what you get.
The other picture is of a blackjack (or lifesaver if you will) that was cobbed together from some old chafing gears leathers I had, a piece of manilla line, and some lead bird shot from another project. The end result is truly dangerous. I suppose it could be used in either form - either hold it at the knot end and swing a pound of lead to knock out or kill or turn it around, grip the leather and hit them with the knot to just bruise and injure. My choice of knots antedates the GAoP but otherwise this is a very passable weapon for the penny-poor cutthroat. Despite it's size it fits nicely in the pocket of my slops.
-
Well, couldn't find my old ditty bag - got this from my wife "I don't know it's in the closet or attic or something" Here's a shot showing a needle-hitched bottle in progress. This is the one I refered to earlier.
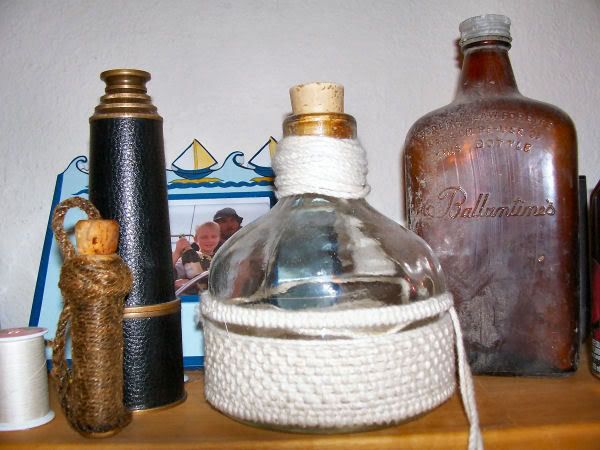
Also there in the picture is another bamboo case I made. This one out of jute. It's mainly just served and tarred. This one has a three strand "rope" lanyard for the cork that I twisted up from the just twine. It passes through a turkshead and then continues to a sort of belt loop. The lower end has an eye spliced into it and then made up so that it just fits over the end of the bamboo making the whole thing fit on to a belt securely but removable without having to remove the belt.
-
Here are the detail photographs I promised earlier.
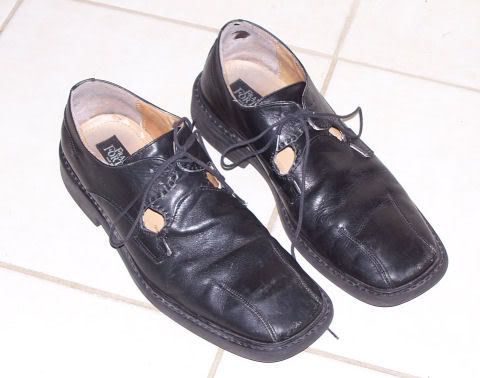
Here are the shoes. Shoes police, don't bash me too hard. I know they aren't right but I like them and I think they turned out ok. I've not strung new laces yet.
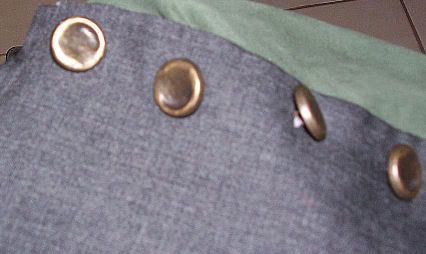
Here's the buttons. Brass ones from Hobby Lobby. They too are a compromise. I like the size, shape, and material and I like that they look flawed, I just wish they weren't all flawed the same way.
-
looks good do your slop have pocket and do they tie in back
Yes to both. Giant pockets on the sides and tie in the back. The slops were actually purchased some time ago. I had been planning on putting together a kit for some time and had finally gotten around to sewing up a shirt when I found out that I had some friends doing a pirate wedding (Some pictures are posted elsewhere on the pub) so I needed slops in short order. Bought them from www.flyingcanoetraders.com after reading a good review on bilgemunky's site.
looks very good sir do you have any better pics of the shoes, thats going to be my project this weekendI will post pictures tonight if my camera cooperates. The cut-outs are probably too small and I left two sets of lace holes rather than one so the latches are probably too wide but the overall look is decent. Shoes can be one of the hardest things - they'll ruin a look if they are wrong and nobody will really notice them if they are right. I'm hoping mine take me closer to the latter.
Those look like horn buttons? Too bad the sailors palm is not PC (isn't it?), it looks great. Perhaps something similar, plain leather reinforced perhaps? I don't know the historical accuracy, though. The purple socks might work, if perhaps the neckerchief or head scarf were also a purplish shade (and vice versa with the red).No the buttons are tarnished brass. I'll try to take pictures. As for the roping palm in the picture.... I'm not sure if it's historically accurate or not. I associate them with 18th century seafaring but that's because I basically assume all fancy ropework with 18th C unless I know better and for some reason I mentally tie the palm in with that though it's has nothing to do with it nor do I use mine for that - go figure. It's safe to say that the job the tool was invented for has been around a very very long time and that something had to be used. I'm not sure what but something. The purple socks are going to go, probably giving way to gray. I just needed something for the picture so I stole my wife's (ugh, always knew a picture of me in womens clothing would somehow end up on the internet.)
-
i made a new neck scarff 36x36 but im not shure how to tie it, i thought i read a square knot, and if yes how do i tie a square knot...

Two overhand knots in opposite directions. The two parts will come out parallel on each side.
-
Ok, here I am so far...
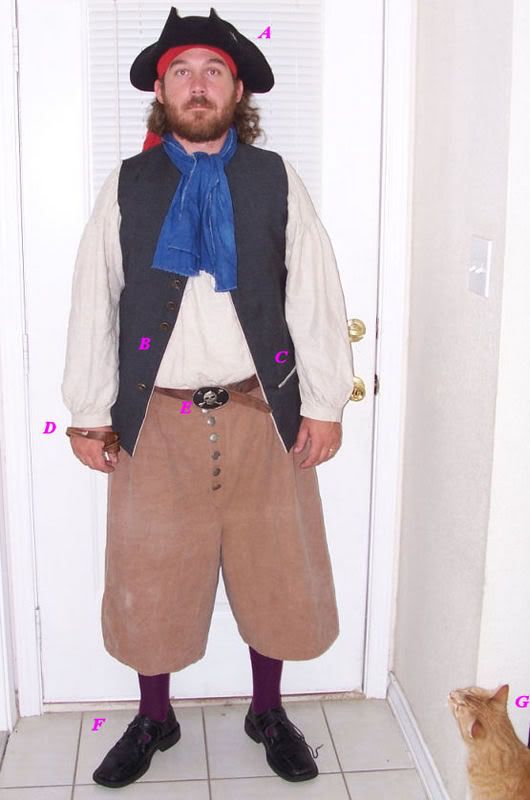
A) The Hat needs to be edged and lined and needs some reblocking after some serious salt water exposure.
 Here's the jacket so far. Note the two missing buttons. The buttons were a compromize but will work. I bought up all that was available locally. Only the top button hole (not shown) is done. I'll finish the button holes over the next day or two. The last two buttons are awaiting restocking.
C) The one pocket needs a flap. Also on the need to do soon list.
D) Ignore the palm. It's not present as a prop I was actually using it just prior to the photo.
E) Also ignore the belt. I need something by way of a belt but don't have anything quite right yet.
F) Here's a new set of shoes. Hard to tell from the dark picture but those are cut and modified into latches. They aren't quite right but they are good enough to be passable and I like them. $3 at the local thrift store. Ignore the purple stockings, I don't have anything quite right yet.
G) Meet one of my two mates - this one is Tiger.
-
Soon I will be working and learning on the Kalmar Nyckel
Wow, I used to work with a guy who ended up going to the Kalmar Nyckel. David Hyatt was his name - neat guy and capable of just about the best Monty Python impressions you'd ever hear. Last I'd heard he died some time ago.
-
Ok, it's time to button up my short vest. I know how to sew button holes but I'm not sure of placement and orientation. First, vertical holes or horizontal? I'm guessing horizontal (perpendicular to most modern shirts). Also, how about side of shirt. The conventional placement is buttons to starboard, holes to port on mens shirts but was this always the case? I've come too far to screw up a detail like these.
-
I've seen second hand whiskey barrels for sale here in south texas. Not often, but on occasion. I believe they are jack daniels barrels and there's no distillery close so I imagine this isn't just local. About $50 to $60 dollars. I've seen them whole and also cut vertically with two internal braces at the level of the bands.
-
I suspected this was the case but wasn't 100%. Thank you very very much. Now on to the pockets.
-
Well, the material is bought, the pattern pieces cut, and the first of the sewing started. Unfortunately, due to some time restraints I've decided to not hand-sew the whole thing but instead hand sew the visible stitches only. Though I'm using the jacket pattern this first project is a sleeveless, collarless vest with pockets. So far so good except I've run across a small problem. I've noticed that the shoulder pieces from front to back are not the same size and there are no strike to marks on the pattern so I'm not sure how they are supposed to line up. Are the smaller front shoulder pieces supposed to be centered on the larger back ones or shifted towards the shoulder or collar? As far as I can tell the instructions don't really answer this, nor do the illustrations. Perhaps the larger piece is to be gathered to the same size that the smaller. That didn't seem right though. I'm at a standstill here. If anyone knows, please help.
-
I think on the other bamboo tubes, I won't just do underhanded grafting, but will play with some overhand grafting, coachwipping, and needle hitching....
You can get a real variety of work by combining all those techniques. Also, grafting in it's basic sense is just a weave so you can use typical weaving patterns as you go to develop some neat patterns. Needle hitching is nice but soooo time consuming so I normally don't have the patience. Also, I have a hard time getting the needle hitching snug to whatever I am working around so I normally do a round of hitching, then take a round turn around the work, and then another round of hitching that catches both the previous hitches and that round turn. That way I can make sure evrything is tight tight tight and so hold on to slick surfaces like glass bottles (will post a pic tonight when I get home from work) and bamboo. I have never been able to get the hang of real coachwhipping. In it's basic form it's supposed to be just a four or six strand square sennit around a work but I just can't do it. If you figure it out please pass on anything you learn. For an alternative you can use an elongated turkshead like the last picture on my "some knotwork" post. For instructions do a search for my becket thread from some time ago.
-
Looking great Pat. A word of advice on the needlecase - if you spend time actually on or around the water with that make it a tad longer and toss a cotton ball in there and give it a squirt of light oil. That'll keep your needles rust free much longer.
With the grafting I came across a website that gave me the following advice which was super helpful to me.
Keep a hard tension on the warpline as you’re doing this. (I sit while I’m doing it and I lead the warp under my right arm and around my body once, across my lap from left to right and then UNDER me arse from right to left as I sit... the spool of line I’m using for the warp usually sits on the floor beside my left foot. This allows me to ‘feed” line as required just by raising up a bit and pulling out onthe left hand.... when I’ve got enough line to work with, I sit back down and the line is clamped. It works well for me.
(*from http://www.frayedknotarts.com/tutorials/grafting.html)
I have a dittybag somewhere that I made when I was about fourteen or so. Last I saw, it was kicking around in my kids room. If I can find it I'll post pictures of the lanyard I made for it. It's not great, it was the first project of that type I'd attempted, but it turned out fairly well.
-
Actually yeah, if you would I'd love to see a samle. Not the rope but the twine. You have my e-mail and a good shipping address. Let me know what if anything I need to do.
-
I would love to but don't have a local supply for anything I really like and I like to be able to handle the material to make sure it's really suitable before ordering anything. I have made some stuff in the past out of larger hemp line - cast offs from the local columbus shp replica's but now even that's unavalable - the ships were re-rigged with manilla.
-
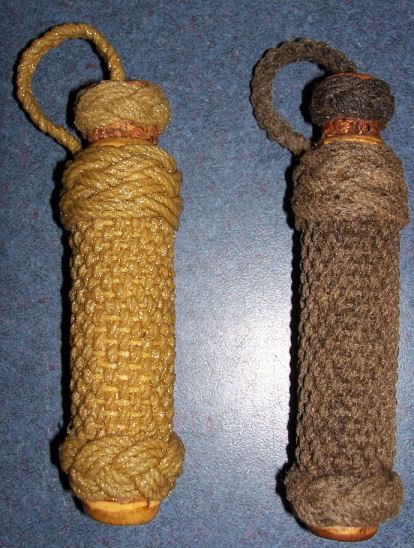
I forgot to mention, the pine tar case is identical to the varnished one except for the stopper lanyard which in the varnished case is a three-strand sennit (think braided hair) and in the tarred is a four strand square sennit. I think I prefer this because the standard three strand braid is just SOOOO familiar.
-
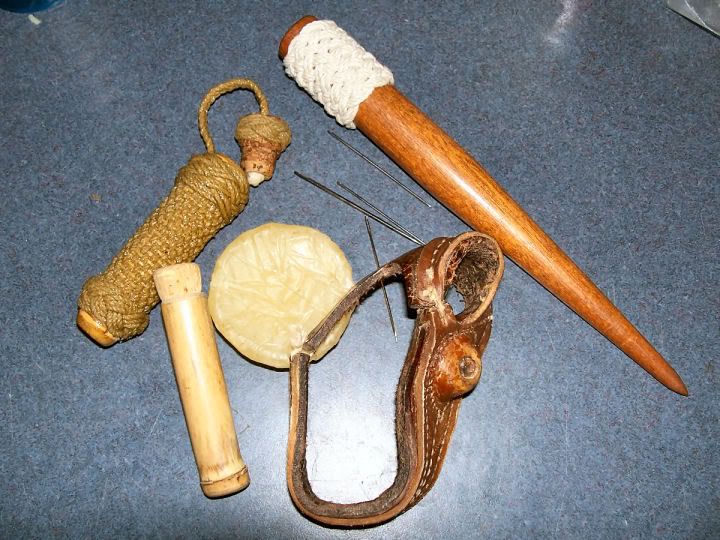
Here's another needlecase showing a different finish. This one has been coated in real pine tar - actually a blend of pine tar, turpentine, varnish, and japan drier. This makes for a nice work-boat finish that I really like. The picture doesn't do it justice as the actual knotting seems obscured but in real life this isn't the case. The pine tar also gives it a fantastic, if aquired, smell that you can literally sense across the room. Also pictured is a small turkshead on the end of my fid plus another showing a couple of tools and a soon-to-be-made needlecase of a different style.

Must be "raining" new swords
in Armory
Posted
I love the VOC mark, very very cool detail. All in all a beautiful sword. I really want to try my hand at making one. I still have access to the rigging shop I used to work in and their metal working tools so hammering out the guard and what-not (ignore my painful ignorance of sword nomenclature - and my inability to spell) is doable but I don't have access to a forge so my only option is grinding down a big piece of spring steel for the blade and I haven't yet been able to find anything suitable.