


MorganTyre
-
Posts
291 -
Joined
-
Last visited
Content Type
Profiles
Forums
Events
Gallery
Posts posted by MorganTyre
-
-
Over the last couple of years I've mentioned in here about using my "normal pine-tar finish" on various projects (axe handle, gun stock, needle cases) but I'd never elaborated on what that is. Well, I just mixed up a batch so I thought I'd share. Here's the mix I picked up years ago when I was working on wooden boats:
4 parts Boiled Linseed Oil
4 parts Turpentine
1 part Pine Tar
1 part Japan Drier
Mix well and slap it on much as you would teak oil or tung oil. The end result is a well wearing finish with a dark golden color. It's also a great preservative. The turpentine really thins it out so it's penetrating. Don't expect a thick glossy coating like a varnish would give. Keep in mind that whatever you put it on WILL smell strongly of pinetar for a good long time which in my mind is a good thing but your mileage may vary. This is a traditional work boat finish and (short of the drier) is %100 natural materials which have been used in this way since the dawn of time and would have been commonplace during the GAoP.
I've also done:
1 part Boiled Linseed Oil
1 part Pine Tar
Which was my slush mix for tarred rigging
-
Does anyone know what the mark up is on Pistols and Muskets? Everyone sells them for about the same price...So I wonder what the mark up is?
Can't speak for the guns directly but I do know retail well. I don't think those selling the guns are making much from them. I would guess probably a 20% margain (which is to say that the profit is 20% of the total price) but again that's an educated guess. To give a point of reference specialty retail (such as marine) you're looking at a %30 to %40 margain. High priced electronics are down around 15-20 or less. The other extreme is a guy I know who sells silver jewelry locally at about %90 (he buys for $1 sells for $12 or so). Typically the cheaper the price you see the higher the markup it has whereas high dollar items (such as $800+) is going to be discounted quite a bit. Seems counter-intuitive but that's the norm. In any case, a %20 markup (if that's about where it is - once again a guess) really isn't worth the hassle and leg-work and if you have a store front it's not really enough to keep your doors open but I'll bet the people doing it are really in it because it's what they enjoy doing not because they are making wild amounts of money.
-
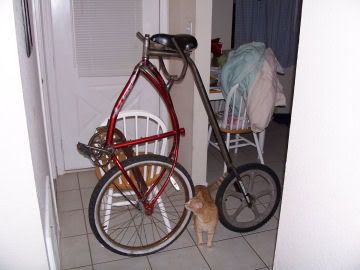
OOH!!! I want to ride it! Very creative/impressive work sir.
Something about it says... Broken spleen or shattered testicles....?
maybe a combo of the two if you time it just right
Actually it's a fairly comfortable ride. When you do fall (and you will) you're thrown forward off of the bike and land right on your feet. That's the reason the handlebars are mounted where they are. There's nothing to hang you up on your way down.
-
Looks great! Sorry if I sounded overly cautious and made a simple, cheap, effective solution sound like a "dangerous set up". I live 2 houses down from an elementary school so there are always curious little eyes and hands around. As for me being the "Weapons Guy" standing here that's a laugh! ! am soo "not worthy" of the knowledge beheld by some of the guys here. They know Faaaaar more than I will ever look for. I just wanted to offer my 20 yrs. experience in guitar repair "wood, metalwork" and a little saftey.
No, the dangerous set-up I was talking about was dealing with the boiling bleach. Sorry for the miscommunication. I have dealt with muratic acid before and you're right, your suggestion is cheap, quick, and effective and a great idea.
-
I've got no pictures of myself in steam gear but I did just come across a pic of the penny-fake-thing I built a couple of years ago. I think it qualifies for the genre. It's a joy to ride.
-
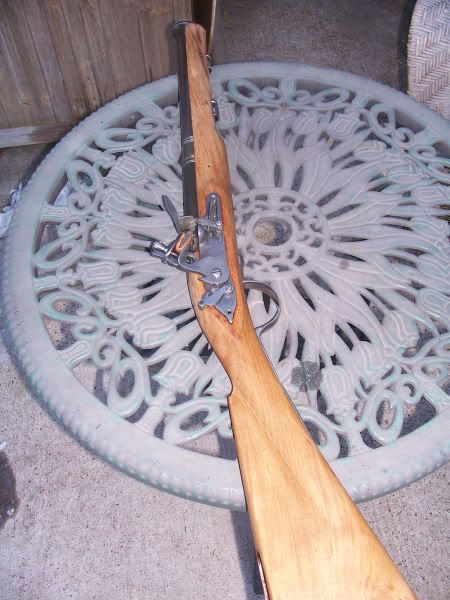

These pictures don't really do the metal finish much justice. The flash was just reflecting the fresh oil making it look much shinier than it actually is. These should give some idea though. The camera was giving me hell. Definitely time for a new one. Note, nothing is mounted here just placed into spot.
-
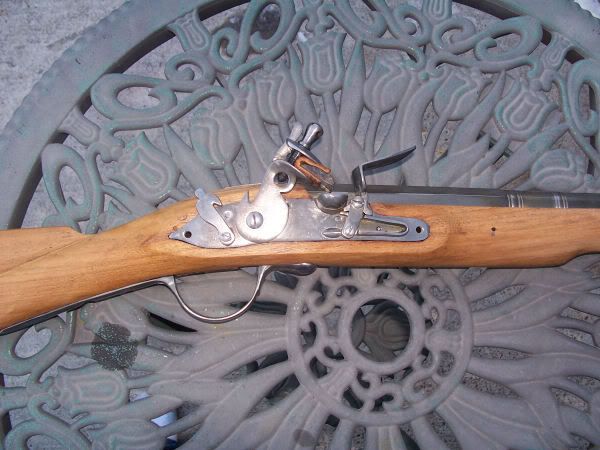
On a different note, I decided to do some work on the metal. I tried the naval jelly technique and have to say that I'm very pleased with the result. The look is similar to silver that is just beginning to tarnish. The bright mirror like shine is gone though that's not to say that the metal isn't still shiny. It's also darkened considerably but not where I would call it actually dark. The finish is also uneven much like tarnish silver. All in all a very nice look and a huge improvement over the original. I will try to post pictures this evening. If anyone wants to try, here's the technique:
Step 1: Completely wash and degrease the part to be finished. Wear gloves so the oils of your hands don't get on the metal.
Step 2: Using a brush (I used the sponge type) apply the naval jelly liberally over the metal. Keep applying more and more, working over the same areas. Keep this up for five minutes.
Step 3: Completely was the naval jelly off using hot soapy water. Wash it until you think it's clean and then wash it some more.
Step 4: Dry the part and then oil as usual.
Doing all parts cost me a total of $5 and took well under an hour and required no special tools or dangerous set-ups. The finish is what I would describe as light but I'm happy with it.
Hey MorganTyre, would you be willing to post some pics of the work (either in progress or when you finish). I like the description you have posted, but I would want to see it before giving it a go myself.
Thanks a ton for sharing your experience in doing this, it makes it seem less daunting for someone who has been pondering undertaking the same task!

Will do. I'll try to get pictures up this evening. The reason I went with the naval jelly is because I knew if I didn't like the result I could take it to the buffing wheel and work the metal back to where it was so it is reversible. I definitely understand daunting. I couldn't bring myself to do it straight out of the box though I got it knowing that ultimately I would modify it.
-
Morgan, since you are a weapons inspector, would allowing a a weapon to brown naturally then oiling it necessarily exclude a weapon from an event?
Cannibal is the weapon's guy (unless his real name is Morgan). Thanks for the heads up on the carving. Yes I would certainly like to see pictures if any are available. I've been trying to decide whether to carve a mark or brand one. I don't really have a way to stamp it and have it turn out as I would want it. For the finish I'm back to thinking about pinetar. I really like the finish that gives and it's certainly salty-enough. The technique I use has been used for centuries aboard ships to preserve and protect line and wood so it's firmly in the "historical possibility but no direct evidence for so assume it wasn't used" category. It's certainly no more anachronistic than the wood of the stock itself (sort of looks like teak but is too light to be teak). Beeswax ala Patrick's suggestion was one of my initial thoughts but I live in a very hot climate and am afraid the wax will cook out. Unfortunately, I've had that experience before on a different project.
On a different note, I decided to do some work on the metal. I tried the naval jelly technique and have to say that I'm very pleased with the result. The look is similar to silver that is just beginning to tarnish. The bright mirror like shine is gone though that's not to say that the metal isn't still shiny. It's also darkened considerably but not where I would call it actually dark. The finish is also uneven much like tarnish silver. All in all a very nice look and a huge improvement over the original. I will try to post pictures this evening. If anyone wants to try, here's the technique:
Step 1: Completely wash and degrease the part to be finished. Wear gloves so the oils of your hands don't get on the metal.
Step 2: Using a brush (I used the sponge type) apply the naval jelly liberally over the metal. Keep applying more and more, working over the same areas. Keep this up for five minutes.
Step 3: Completely was the naval jelly off using hot soapy water. Wash it until you think it's clean and then wash it some more.
Step 4: Dry the part and then oil as usual.
Doing all parts cost me a total of $5 and took well under an hour and required no special tools or dangerous set-ups. The finish is what I would describe as light but I'm happy with it.
-
You are quite welcome! Looks are unimportant. You can make it look older and add staples after the repair, I just don't want a damaged weapon being fired! Especially if it runs in a circle where it my end up being fired next to me or someone I care about! As a certified black powder safety inspector through the Florida state parks service, I have to tell you that if I inspect a gun with an improperly repaired or unrepaired crack in its stock. It aint shootin at that event. Best Wishes on your endeavor. And remember "If you can't find the time to do it right, where will you find the time to do it over?"
That is a very very good point. I'll be sure to do it well. That said, considering there are two unrelated areas of damage to the stock on a new gun, both completely concealed by the finish I can't help but assume that sort of shoddy work is par for the course on an indian gun.
-
As for your crack, I would have repaired the crack before removing the original finish with a stripper, due to the fact that you now have misc. residue in the crack and open wood around it, so lets deal with that first, work several drops of stripper into crack , give it time to soften whatever residue is in it, add a little more stripper, and squeeze crack together, a vise or clamp can be used but dont get carried away. this should squeeze out most of the residue and form that which is remaining to the shape of the crack. Remove from vise/clamp and let the stripper evaporate. Once it is dry take warm water and drip a few drops into the crack work the crack closed a couple of times' you want the inside of the crack to be wet, not dripping but wetter than moist. Than using Tightbond II weatherproof wood glue, if the crack is more than 1 inch deep into the wood "not length of crack but depth" thin glue 50/50 with warm water and work into crack, then work unthinned glue into crack. If less than 1 in. deep work unthinned glue into crack and clamp shut. clamping the pistol stock is the hard part as sometimes the odd shape makes it tough to apply pressure where you want it, do not overtighten and squeeze all the glue out, tighten until crack closes, remove excess glue and let dry. You shouldn't need any dove tails or "heaven forbid" staples. On a footnote if you plan to stain it, do it after removing residue, but before the crack repair as the open wood around the crack will absorb the glue and take stain differently.
The crack wasn't visible with the original finish on, nor was another heavily repaired area. I wasn't so much worried about doing a professional looking glue joint. To the contrary, I don't mind emphasizing the damage. The staples (hammer in, not to be confused with modern staples) I've seen as an actual fix on a rev war era gun and it look good in a field-repair sort of way so that's where that idea came from. I'm certainly not comitted to it though. Great repair info though. Thank you very much.
-
Thanks all for the reply's. I just finished stripping the stock and it looks SO much better now that that finish is all gone. For those who want to do it to their guns, MEK (methyl ethyl ketone) is THE tool for the job. At this point I'm leaning heavily towards leaving the wood unfinished and letting it pick up whatever dirts and oils it's exposed to but I'm still not 100% sure. Also, I do need to repair a crack in the stock. I have seen metal staples used to pull a crack closed on a much later gun. Would this be a period fix? How available would the materials have been? Any other suggestions?
-
I thought mustard was just another agent used for browning?
I haven't used mustard, but have read of other that have, it's used to dull the metal finish on guns... the mustard holds the acidic vinegar in place (Over night if I remember correctly).....and then is rinsed off.
Because I ground off the muzzle ring off my buss, I had to clean the barrel up anyway, and just finished it with steal wool, so it's not chrome shinny....
Did the steel wool give a brushed sort of look or an even dull gray? I can't tell from the pictures you've posted.
-
Well now that the new and shiny (psychological) has warn off of my doglock blunderbuss it's time to start some modification work on it. First things first, I used some MEK to strip the finish off of the stock (bare stock, everything removed of course). I will say, the stock on these is VERY poorly done. There's considerable damage in a few places which have been quasi-repaired with wood glue. This includes a palm length crack at the end of the stock that with the barrel out and the finished removed I can see daylight through and a large area broken in the in-letting of the lock which was then patched back in to place. Considering what I bought this gun for and my own personal aesthetic it's no big deal but I do feel I have to say buyer beware. If I were not planning on doing what I am doing I would not be pleased at this point but considering that the repairs weren't obvious until I stripped everything down I doubt very much I have much recourse with the dealer at this point. Still, I have to say again that in my particular case I am not concerned because damage = character in my opinion.
Now that the wood is stripped and clean it's time for a new finish. I'm torn at this point between tung oil, boiled linseed oil, pine tar, or no finish and let the stock pick up whatever crap it happens to get. Pine tar is my typical coating of choice. It's very good looking, somewhat water repellent, and smells great. It's really a 50/50/50/50 choice at this point though (wow, 200%! Somehow I got an extra gun out of the deal) Any suggestions?
I'm also considering adding a mark at this point. I'm not thinking a personal mark so much as a merchant mark (NOT potc style EIC). Was this ever done to indicate ownership by a particular vessel? I know that typically guns were kept locked and only issued if there was trouble but were they the actual property of the ship? Would it be reasonable for one to carry a mark of any sort? Is there any evidence to support this idea? If marks were on stocks were they carved, stamped, or branded?
It's also time to do something about that bright and shiny metal. I am not looking for suggestions of just keep it oiled and use it and let it age on its own. I want to dull things down quite a bit. I've heard of mustard, naval jelly, boiling bleach, browning, and bluing. Of course I could also just plug the bore and leave it in the trunk of my car with my wet dive gear for a year. That did incredible things to my axe. I'm leaning towards the bleach for the barrel and naval jelly on the lock. There is some great how to info over on the muzzle-loaders forum but I am looking for some second opinions from people in my time period. Share your first hand experiences please.
-
Seems to me that one of Hervey Garret Smith's books talks about belaying pin proportions. Also some neat info on making cleats, deadeyes, and seachests. I wish I could remember which book it was...
Did some digging. I think (emphasis on think) that it's this one:
http://www.amazon.com/Marlinspike-Sailor-H...h/dp/0070592187
-
-
Never be afraid to sand metals. It's amazing the quality of the results you can get. A nice finish can certainly be achieved by hand but a few inexpensive tools and you can produce true mirrors out of the roughest old rusty stock ion a surprisingly short time. For your specific project (just speaking generally since I know you've already come up with something that works) since it's brass (ie soft) I'd start with 600 grit wet/dry trimite (it's a black sandpaper made by 3M. Best stuff ever) and wet block sand it. Use lighter hand pressure as you work your way down. Block sanding will knock down the ridge caused by the gouge and take everything down to the base metal level. I'd leave it at that point. I started to write up a whole explanation why but it's probably not necessary. I can elaborate if anyone wants. Honestly with brass that should do the trick. The sandpaper will leave a matte finish which brasso will buff out.
-
Aye Morgan..occurs in May does it not???? My hubby is from that area and my Mother in law is in Padre and always keeps me informed. Hmm would indeed be nice to have a bunch of Pirates show up for that..fun too!!!
Yep, may sounds about right. A dozen or so years ago somebody did try to organize something somewhat piratey. The coliseum was turned into a darkened tavern with belly dancers and such. Not the best turnout though and I'm not sure who was organizing it. Otherwise, I've never really seen a good buccaneers connection to buccaneer days.
-
Hello there. I'm in Corpus Christi. Wish the state weren't so damned big. Just a trip to austin is enough miles to cross a state or two in most areas of the country. We've got Buc Days (short for buccaneer) down here but it's long lost the pirate associations. I've always thought it would be fun to organize something down here to coincide with that. That's in mid spring.
-
Excuse 'em moi, but "fully functional" and "non-firing" are contradictory descriptives!
Anyway, I'd want them firing forward!
Hehe, I'm sure they're fully functional as knives and forks. Neat little items, I wish they worked!
-
Can someone tell me why the dog-lock evolved into the flintlock? It seems to me the external dog is a more sure-fire safety catch than the internal half-cock mechanism and is certainly easy enough engage. Is there some other advantage to the flintlock?
-
I recently picked up one of the doglock blunderbusses from Middlesex and absolutely love it. I will post in-action shots of it here sometime soon. What I'm wondering is if anyone has a good reccomendation on slinging it. I don't want to attach hardware to it directly and I certainly dont want any sort of holster. I'm looking for a method that would be both period and practical. To give a scenario for use think in terms of a large weapon kept close at hand but I'm wanting both hands free as I unload smuggled goods from a jollyboat on the beach. Any suggestions?
-
The following is a quote from "The Sea Gunner" circa 1691:
There is good use made of Hand-Granadoes in Assaults and Boarding of Ships; these are made upon a Mould made of Twine, and covered over with Cartridge Paper and Musket Bullets cut in two, put with Past and bits of Paper thick on the out-side. After you have doubled the Shells, past on some at a time, and let it dry, and put some more until it be quite full; then dip it in scalding Rossen or Pitch and hang it up and it is for your use: But you must have the innermost end of the Twine left out, and before you pitch it you must draw out the Twine and stop the hole, and then pitch it.
To Load them, fill these shells with Gun-Powder, then make a Fuze of one pound of Gun-Powder and six Ounces of Salt-Petre and one of Charcoal, and fill the Fuze; then knock it up to the head within one quarter of an inch, which is only to find it by night.
Stop the rest of the holes well with soft Wax; your first Shells must be coated with Pitch and Hurds lest it should break with the fall; and be sure when you have fired the Fuze, suddenly cast it out of your hand, and it will do good execution.
I think I remember these being discussed in the old grenade thread but I don't recall anyone having made any. These seem cheap, easy to knock together, and documentable from a period source. Has anyone tried making any? The description just sounds like simple paper mache.
Note, it should me mentioned I'm talking about replica grenades - not actually live with gunpowder. I'm thinking crushed charcoal to get the look of the gunpowder. I think I'll try my hand at a few.
-
Wheel-lock
in Armory
Most of this is a little late. Lots of great blunderbusses at the beginning but I'm posting this for the wheel lock at the very end. Very pretty.
-
So it sounds like the cartridge is just a pre-measured charge that gets torn open and poured in rather than the whole think being dropped in the gun and pricked at the vent hole. Thanks! That's one mystery solved. Now it's time to try my hand at making up some.
Wood finish
in Crafting Kit
Posted
If I remember correctly one of the old foxfire books had a section on home making pine tar. It's one of the original cottage industries. The consistency is a little like thin honey. It also has a very very distinctive smell. It is commercially available though it can be hard to find (http://www.tarsmell.com/tar.html is my source) but a single quart will last a very long time.