


MorganTyre
-
Posts
291 -
Joined
-
Last visited
Content Type
Profiles
Forums
Events
Gallery
Posts posted by MorganTyre
-
-
I've picked up some 1 1/2" manilla line here and am looking to sell it off relatively inexpensively. It's not period hemp but it's an acceptable substitute. I'm seeing it online for $3.85 a foot but I have it here for less than half that. I'll cut to any length you want and ship it out ups ground. If anyone wants any please let me know.
-
The following is a quote from "The Sea Gunner" circa 1691:
There is good use made of Hand-Granadoes in Assaults and Boarding of Ships; these are made upon a Mould made of Twine, and covered over with Cartridge Paper and Musket Bullets cut in two, put with Past and bits of Paper thick on the out-side. After you have doubled the Shells, past on some at a time, and let it dry, and put some more until it be quite full; then dip it in scalding Rossen or Pitch and hang it up and it is for your use: But you must have the innermost end of the Twine left out, and before you pitch it you must draw out the Twine and stop the hole, and then pitch it.
To Load them, fill these shells with Gun-Powder, then make a Fuze of one pound of Gun-Powder and six Ounces of Salt-Petre and one of Charcoal, and fill the Fuze; then knock it up to the head within one quarter of an inch, which is only to find it by night.
Stop the rest of the holes well with soft Wax; your first Shells must be coated with Pitch and Hurds lest it should break with the fall; and be sure when you have fired the Fuze, suddenly cast it out of your hand, and it will do good execution.
I think I remember these being discussed in the old grenade thread but I don't recall anyone having made any. These seem cheap, easy to knock together, and documentable from a period source. Has anyone tried making any? The description just sounds like simple paper mache.
-
But maybe MorganTyre can school us with a demonstration picture or diagram. ? .
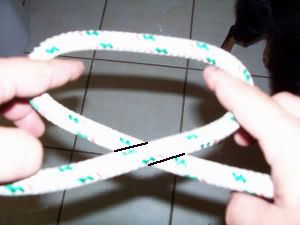
Here's just a quickie on the constrictor hitch. As I said, with practice this can be tied in less than a single second.
Step one: Toss a bight in the line with your hands oriented as pictured. Note the line on top is the one leading to your left hand.
Step two: Release the line with your right hand, flip your hand over, and re-grab the line as you had it before. It's hard to describe but the picture will show the final orientation. Note the position of the right hand.
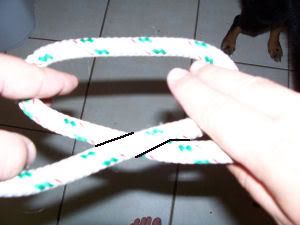
Step three: Now, while holding on to the line flip your right hand back to it's original position to end up as shown.
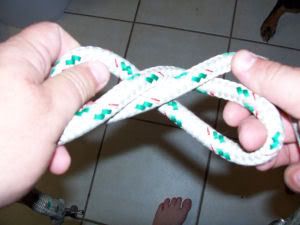
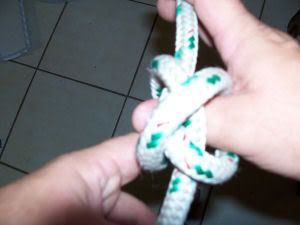
Step four: Take the two bights of line (loops on the left and right side) and fold them together towards you. Congratulations, you've made a constrictor hitch. Place the two bights over anything round (such as my thumb in the picture) and draw tight. This is the single most important knot in fancywork. Hell, I consider it second really only to the bowline in terms of general usefullness.
-
I'm pretty interested in how the progress is going as well. I wish you luck in your venture mate.
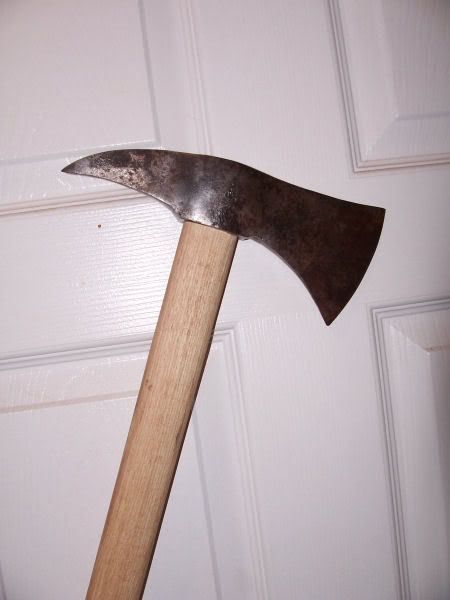
Well, here we are a year later. Sorry, I'm finally getting back on track. This has been a very busy year for me. I've taken over management for one company and bought out another. Not much time for hobbies I'm afraid. The finished axe head lived in the trunk of my car for a year where it had wet and salty dive equipment stacked on top of it regularly. I've cleaned off the light surface rust and ended up with this fantastic patina. The handle is going to get my standard working craft brew (mix of varnish, japan drier, and stockholm tar).
-
I'm sure it will be talked about heavily throughout the linked threads I just want to mention the simple diamond tent. This is by far the easiest and most basic tent and an appropiate piece of canvas (albeit cotton) can be picked up inexpensively as a painters dropcloth. If you rag it out a bit and sew patches here or there you'll have a very quick (maybe an hour or two of work to get the material in to that salvaged condition) and cheap period shelter that you can set up in minutes. The only downside is a lack of privacy but a seaman used to living in close quarters with other men wont be concerned about the privacy.
-
Considering everything is made out of rope, I'm sure there are all several self-tightening knots that could have done the trick of securing the brush once it was wound around. Though it would be cool to know what was commonly used.
Thanks Jim for the diagram - it's great.
Constrictor hitch the end of the line and it would hold as well as a tack. Good knot, that. Can even use it as a hoseclamp in a pinch and with practice you can tie them in a single second (seriously). Not to be confused with the inferior strangle hitch.
-
Very nice piece...
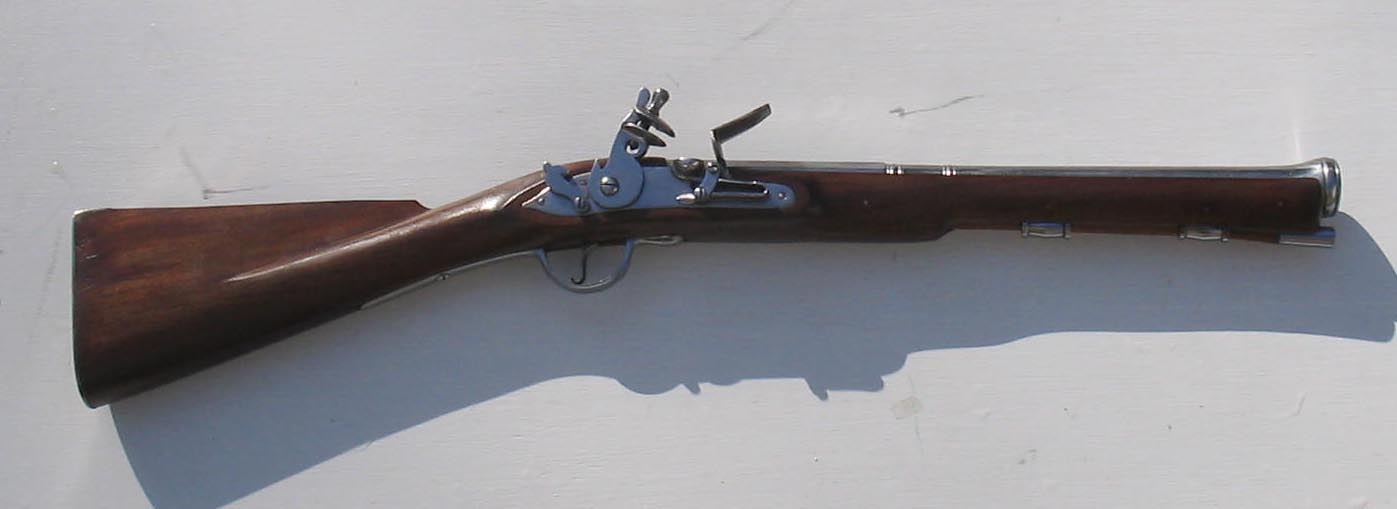
And to chime in about extras, if you plan to use said piece in reenactments, My main time period has been 1750s-60s+ That being F&I and ACW... They REQUIRE a flashpan guard on any and all weapons used on the field.
I've personally been on the receiving end of having a fellow reenactor have a flint shatter next to me. If it had not been for the guard, I'd have had a face full of flint shards. Thank you, no...
Unfortunately there are no reenactment groups within a hundred miles of me. At least none that I'm aware of. The closest likely place would be Houston and that's several hours away. I'm really looking forward to this purchase, especially after hearing the good reviews. I can tell there's a ton I don't know though. I'm not new to shooting but I am to black powder. Does anyone reccomend a basic primer on the subject (specifically flintlocks as percussion cap guns don't do anything for me).
-
Hello all, long time no type. I see quite a bit has changed around here. I'm looking to save up and purchase my first and only black-powder as a Christmas gift for myself after an unusually good year. As some of you may or may not remember, I've kicked this around for some time but this one really is going to be the year. Right now I'm leaning heavily towards the Doglock Blunderbuss from middlesex. The blunderbuss as a weapon has always topped my list and this one in particular really appeals to me. I was able to handle one (just hold, not fire) this last weekend and fell in love. Does anyone have any specific thoughts on this gun? How about general advice from a first time buyer? I'm wanting a functioning gun from the get-go without much fussing and messing with. I'm the type that does tend to get elbow deep into a customizing project but I like to handle/use something for a year or so before digging in. Would this gun suit my needs? How is middlesex as a company to deal with?
-
The final episode of bus pirates has just been released. Just thought I'd pass that along to those of you following the series. www.buspirates.com
-
I am seriously leaning towards Kass's pattern as my experience with her short jacket was a good one. Still, I'm leaning towards a slightly later style (after looking over the evolution of the design on gentlemenoffortune.com) as long as I have an overall consistency in my era of clothing (though the color scheme, wear and tear, and fit may be inconsistent) Does anyone have any good pictures of the reconstructing pattern from different angles? The photograph of the finished product on the website is from one angle only.
-
Buy Kass' pattern. Hell, buy two of them!

If you have to, make a new shirt.

Hehe, no chance in hell of that. At most I'll re-make the collar and that's only if I absolutely have to. That's my only 100% hand-stitched (and tiny stitches at that), linen shirt. It was my first real project and took me an eon. It's also the singlemost comfortable piece of clothing I own. My biggest concern are the pants. I may end up having to make a new set of slops. Most of the earlier stuff I've seen seem to have a closer cut leg. I suspect these are french/indian war era (considering the source) and so are way too late.
-
Ahoy all! It's a new year and time to get back to the kit. As a quick refresher, here's a photo of me from last year's ren faire. This is obviously day two as evidensed by my absent shoes and stockings. So far I'm sporting a fairly universal linen shirt (with a little later style collar), slops from flyingcanoetraders.com (my only purchased piece), and a wool/linen lined sailors short jacket from Kass. I'm wanting to come up with a Justacorps to wear over everything but I want to stay somewhat consistent with the time period and I think my pants and shirt collar (a taller collar than the short stand collar) are probably late for Kass's 1680 justacorp pattern. Any suggestions? Note, I am not comfortable enough with my sewing to try to go by a historical tailor's pattern. If the reconstructing history pattern would work I'll buy it in a heartbeat.

-
Sorry I never posted a follow-up. The axe head itself is shaped and turned out nicely, I just need to strip off the remainder of the red paint and then put it on a new handle. To be honest, the project moved back a notch. After the recent ren faire blew and the weather has gotten cool my love of all things authentically pyratey took a back seat to my second fascination and that's the uber-fictional world of victorian science-fiction (steampunk). My time has been taken up by a penny-farthing inspired bicycle project (
) I'll get back on track here within the next couple of weeks though. -
I'm going to do the legwork here and give the seaport museum a call today. I'll post this afternoon what I find out. As I said, I'm assuming they'll distribute it but I may just be making an ass out of Ume. Still, very cool book - I hope I can get it somewhat available.
-
Well, I believe the Elissa has set sail from my home port and is bound back to her own but she left me absolutely in love. I'd done quite a bit of work with and on smaller square riggers in the past but nothing near so grand and beautiful. Among many other things, the staff put on a one day quick sail-training session and though the turnout was sadly low, the enthusiasm was high. We hoisted 15 of the 19 sails (Three headsails, fore course, fore lower tops'l, fore upper tops'l, main t'gallant stays'l, main topm'st stays'l, main course, main lower tops'l, main upper tops'l, mizzen topm'st stays'l, mizzen stays'l, spanker, and gaff tops'l) and went through the motions of tacking. All in all a great time. Now to the point - All volunteer trainees get as course material a seamanship manual which covers an incredible amount of info from the simple such as belaying to a pin correctly to the obscure and arcane such as the "stroke oarsman" aboard a small boat. They offer this manual for sale in their gift shop area for $30 or so but they also sell a CD with the entire book in PDF format for $5. I don't know this for a fact but I assume one can probably get that same file if you contact the galveston seaport museum and do some sort of donation over the phone or via the internet. It's a neat neat book, way late for our period, but chock full of square rigger handling goodness.
-
Ok, here's the roughed out pictures:

Next step is some more filing to smooth out the curves then some light filing to clean up some tooling marks then it's time to start sanding away that red paint and grinding/filing marks. At the end I'll hit it with a buffing wheel and then give it an oiling.
-
No worries there, I never let the metal get even too hot to touch. I go slow and cool regularly.
-
Jas-Towsend has a boarding ax (head-only) for $24
I agree about the time vs money but my time is free and my costs are going to be about 1/2 that of a handle-less head from them plus I get the added bonus of the pleasure of a job well done. I've actually wanted to try a project like this for a couple years though back then it was turning a hatchet into a bearded trade axe - something I may end up doing eventually.
That looks pretty do-able, but might take some time... I wish you the best of luck!That being said, I'd like to try this too, being that I have access to those tools AND a plasma cutter. Where'd you get the Fireman's axe?
Thanks! Time-wise I probably have two hours into it and it's about 80% done. With a plasma cutter I probably could have cut that time down to about 30 minutes. The axe was a $10 cheapie from harbor freight. I think they usually go for $19.99
-
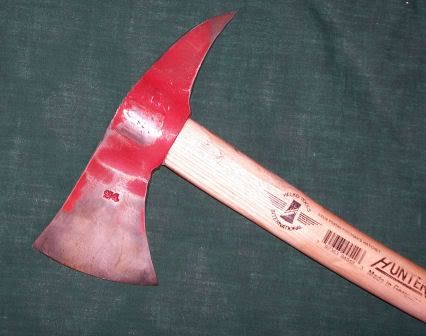
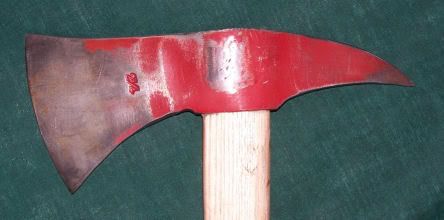
Being the cheap bastard that I am and having no passable piratical weapons I've decided to turn this:

in to something like this:

(both images used without permission, I'll yank them if requested)
This will be done entirely with a grinder, hacksaw, file, and sandpaper. Obviously I'll never be able to duplicate it entirely - the method the handle is attached is obviously modern and the angle of the blade is probably 5 deg in rather than parallel to the handle but so far it's coming along very well.
Note, cutting tool steel - even cheap chinese harbor freight tool steel - is NOT easy but it can be done. I only wish I still had access to a plasma cutter. My shape is roughed out nicely, it's just file time. Also, the red paint has been suprisingly tenacious - probably loaded with lead. I am considering knocking the handle out so I can work with just the head but I don't know that I'd be able to find another hatchet handle to fit. All in all that would make it about a million times easier though so it might be worth the effort. Anyway, pictures will be posted soon. Hopefully I'll end up with a decent looking axe for under $25.
-
Not surprised in the least. However, I'd imagine that you had wind somewhere aft of the beam. If it were an upwind race, she wouldn't have stood a chance. However, 1877 was just about the peak of working sail technology, right in the middle of the clipper era. They were designed to follow the trade winds and make the best speed possible. Heck, the a clipper's record from China to England around Cape Horn wasn't beaten until the 1980s by a catamaran. And that's not a speed record under sail, but a speed record period. This is definitely a nice notch in the belt for tall ships.
Coastie

Yep, wind ranged from just forward of the beam to dead aft depending on where/when in the race. Never a beat. I did see something I'd never seen before though. This is probably old hat to you but I'd never seen a square rigger tack before. Not in real life, not in movies, not ever. It didn't ever occur to me that they even could. Fascinating thing to watch.
-
Ever wonder about the abilities of the old tall ships? We just finished up the Harvest Moon Regatta here on the Texas Gulf coast. For those who aren't familiar with it, this is a 150 mile offshore race from Galveston to Port Aransas. Somewhere in the neighborhood of 260 boats competed this year - everything from the ultra modern to the interestingly old. Tall ship old. The old girl from 1877 wasn't handicapped and wasn't scored but it's just as well as I'm sure she'd through off the curve. Of the 260 or so boats to start she physically hit the finish line noon friday fifth, beat only by three trimarans and a J-144. To put this in perspective, we sailed in some seven hours later on our J35 and we were still one of the first ten boats or so who finished (2nd place in Class - woohoo)
-
Morgan, an old leaf spring from under a truck, car or trailer wiil do fine if that s the route you are going to take. You should be able to get one at any salvage yard for a nominal fee.
I'd considered that but then I have to straighten it out and I really have no idea how I'd do that. I'd also end up with a sword with a hole right in the middle.
-
Wow, fantastic stuff Foxe!! In what Im sure is a stunning example of overlooking the obvious, I cannot find any of the stuff you listed on Kass's site. Are they available through her site or just Kass directly?
-
All these are spread elsewhere about the forums but here's a sample of some of the small stuff I've done.
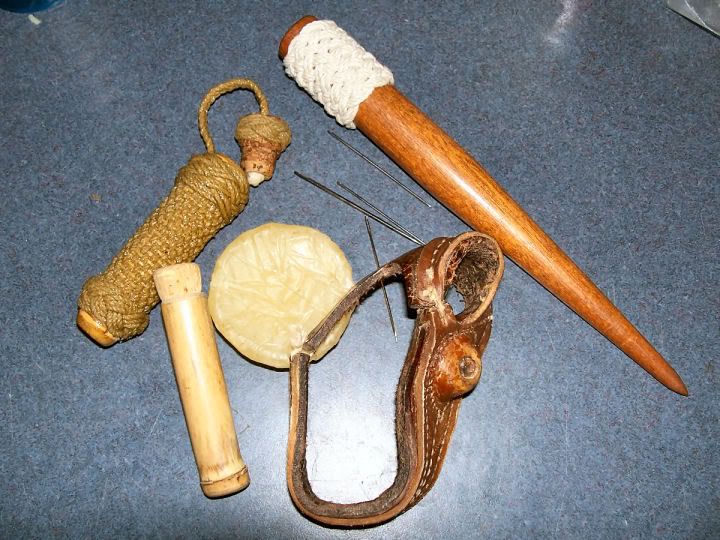
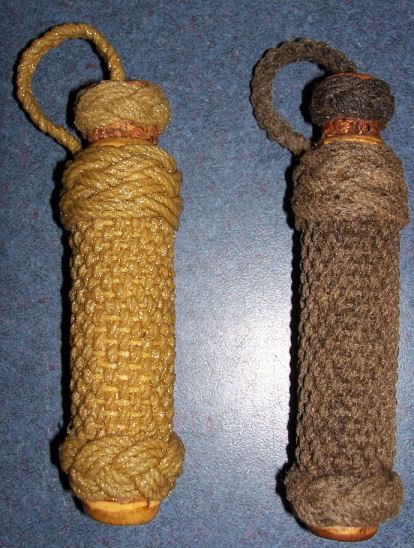
Here's my list of future projects -
Small fishing kit
Serving board
Serving Stick
Coin bag - initially just a sewn canvas bag but eventually I'd like to make the type described in Ashleys #2877
Cartridge Box (this one is was in the future as I don't yet have any weapons)
Rigging Knife - ground from a file, I've done these in the past and like them but use them hard and regularly break them.
Cartridges?
in Armory
Posted
I have some basic questions regarding cartridges. I've seen many references to them (such as the cartridge box from the whydah, etc.) but am not really sure what they are. Are these paper cartridges like the two links below? Are the cartridges just pre-measured powder that are torn open and poured down the barrel or is the whole thing rammed down the barrel? Does this make for a good blank load without wadding, etc? Any thoughts, reccomendations, etc on the subject?
http://www.lazyjacks.org.uk/cartrdge.htm
http://3rdalabama.org/roll_cart.htm