madPete
-
Posts
1,903 -
Joined
-
Last visited
Content Type
Profiles
Forums
Events
Gallery
Everything posted by madPete
-
untilThe Harbor Beach Maritime Festival was created in 2000 as a celebration for the City's new ownership of the Harbor Beach Lighthouse. But over the past 10+ years, the Maritime Festival has become one of the area's largest and most exciting celebrations. http://themaritimefestival.com/ Facebook
-
untilMeripäivät (Kotka Maritime Festival) is a legendary summer festival held in Kotka, a beautiful seaside town in Southeastern Finland. The festival was founded in 1962 and since then, Meripäivät has become one of the biggest festivals in Finland attracting around 200,000 visitors every year. Meripäivät offers a wide variety of events for all ages and most of it for free! The diverse festival programme is a delightful mix of music, sports and family events. The majority of festival events are located in the city center which is easily accessible by public transportation or bike. During the four festival days the whole town gets together to celebrate and – most importantly – to enjoy the unique atmosphere Meripäivät is famous for. https://meripaivat.com/en/ https://festivals.fi/en/festivals/kotka-maritime-festival/
-
 untilThe Scottish Traditional Boat Festival will return on Saturday 28th and Sunday 29th June 2024. This is the 32nd anniversary of the event and a flotilla of heritage boats from across the country, will drop anchor in the historic harbour of Portsoy for a weekend of celebrations. Upholding the north east’s maritime heritage, there will be a packed programme of entertainment including music and dance, the finest Scottish food and drink and demonstrations of age-old crafts, unique handmade items and gifts. The festival will begin with our Big Gig on the Back Green on Friday 27st June 2025. More information will be announced soon, so keep an eye on our website and social media channels. Be sure to set sail for Portsoy’s boat festival to be part of the magical mix! https://stbfportsoy.org/
 -
untilThe Anacortes Waterfront Festival is a free event that showcases the best of waterfront activities. This family friendly event holds many traditions for local residents and visitors including: Quick and Dirty Boat Building Competitions, free boat rides provided by the Anacortes Yacht Club, hands-on children’s activities include building wooden sailboats with Fidalgo Island Rotary, games, making costumes, and more. The Channel of Discovery displays range from canoes and a pirate ship to learning about marine wildlife education and the environment. This fun filled festival also features food vendors, food trucks, and live music and performances! Saturday: 10:00am to 6:00pm https://anacortes.org/event/anacortes-waterfront-festival-2024
-
untilWild Atlantic Shanty Festival The Wild Atlantic Shanty Festival is an annual music festival held in the small coastal town of Rosses Point, located in County Sligo, Ireland. The festival takes place over a weekend in June and celebrates the rich maritime heritage of the region with a focus on sea shanties and traditional seafaring songs. The festival takes place in various venues throughout Rosses Point, including pubs, hotels, and outdoor stages and offers a range of traditional music, with performances by local and international artists, as well as opportunities for visitors to join in with singing and dancing. In addition, to live music, the festival also offers workshops, talks, and other events related to maritime history and culture. https://www.inishview.com/events/wild-atlantic-shanty-festival/
-
festival maritmo - Pasaia Itsas Festibala - Gipuzkoa, ES
madPete posted an event in Community Calendar
untilThe distinctive note of Pasaia Itsas Festibala is its clear bet to ships with heritage value. We give great importance to the authenticity, quality and heritage value of the participating ships, because this is our way of protecting and preserving maritime heritage. Through the recovery of the trades and technology inherited from those who were before us, we understand and honour all that knowledge, that immaterial treasure that is at risk of being lost. https://pasaiaitsasfestibala.org/en/ -
untilAround one million guests from Germany and abroad travel to HAFENGEBURTSTAG HAMBURG every year to be fascinated by the ships from all over the world against the impressive harbor backdrop in the heart of Hamburg. From the Fish Auction Hall to the Elbphilharmonie Concert Hall, as well as in the Traditional Ship Harbor, Speicherstadt, Hansahafen and Museumshafen Oevelgönne - HAFENGEBURTSTAG HAMBURG offers a maritime and eventful non-stop program for the whole family along the Elbe. The water program on the Elbe in front of the Landungsbrücken as well as in the Museumshafen Oevelgönne includes highlights such as the arrival and departure parade, the unique tugboat ballet and the popular open-ship activities. Every year, numerous ships take part - including impressive tall ships of the world's oceans, traditional sailing vessels and museum ships, naval and cruise ships, motor and sailing yachts as well as emergency vehicles of the German Federal Police, the German Society for the Rescue of Castaways, fire department, fishery protection, THW, water police and customs. On land, maritime, cultural and culinary offerings provide varied pleasure. Open-air concerts and live acts with national and international artists transform the shore along the Elbe into a huge festival landscape. Exciting guided tours, exhibitions and the special hands-on offers of the museums in the Speicherstadt and in the Hansahafen complete the variety of experiences. On Saturday evening, the breathtaking fireworks display offers a fascinating light spectacle in the heart of the Hanseatic city. Each year, a different country is given the opportunity to present itself as a country partner and give visitors an insight into its culture and way of life, including its culinary specialties. HAFENGEBURTSTAG HAMBURG goes back to the legend surrounding Emperor Frederick Barbarossa, who issued a charter to the people of Hamburg on May 7, 1189, granting duty-free passage for ships on the Elbe from the city to the North Sea. This date has since been considered the birth of the Port of Hamburg, which is why HAFENGEBURTSTAG HAMBURG is usually celebrated on a weekend around May 7. https://www.hamburg.com/port-anniversary/ https://www.maritime-feste-deutschland.de/en/hamburg-port-anniversary.html
-
The Port Clinton Lighthouse & Maritime Festival was established to celebrate Port Clinton’s rich maritime heritage, exemplified by the beautifully restored Port Clinton Lighthouse, the last remaining wooden pier light on Lake Erie. The one-day festival features lighthouse tours, nautically themed art and educational programs, food and merchandise vendors, music and other entertainment, and stunning views of the Lake Erie Islands. This year the date of the event is again the third Saturday in August–Saturday, August 17th, 10 am – 4 pm. The third weekend in August is International Lighthouse and Lightship Weekend (ILLW) and is celebrated by lighthouses and amateur radio enthusiasts throughout the world. By the way, the name of the event–The Port Clinton Lighthouse & Maritime Festival–now more accurately reflects our intent to make this an event that truly captures Port Clinton’s intimate relationship with the Lake Erie and Portage River. The festival will again be held in Lighthouse Park, east of Waterworks Park, where we have the replica Keeper’s Boathouse, as well as landscaping improvements, extra seating and eating areas. https://portclintonlighthouse.org/2019-festival/
-
untilCork Harbour Festival is a celebration Cork’s unique maritime heritage as the second largest natural harbour in the world. Festival visitors can explore the history, heritage, and the stunning landscapes of Cork Harbour, as well as the flagship Ocean to City – An Rás Mór, Ireland’s premiere long-distance rowing race, on 8 June 2024. From on-the water adventures to music, art, poetry, workshops, talks and seminars and family-friendly events, there is something for everyone. Next year’s Festival will take place 1-10 June 2024 and we look forward to seeing you back then. Please sign up to our mailing list and follow us on social media to receive all the updates. https://corkharbourfestival.com/
-
untilRathlin Sound Festival immerses in the people, culture & heritage of the area. Located around the famous Rathlin Sound body of water, it connects Rathlin Island to the shores of Ballycastle. The vibrant harbours are a hub of activity with many visiting vessels. Enjoy the Arts, Music, Storytelling, Artisan Market, Food & Drink and learn about the heritage of the Coast. The festival brings together people from all over the world who come and experience the friendly warm welcome that is synonymous to the Causeway Coast & Glens. https://www.rathlinsoundmaritimefestival.com/ https://www.visitcausewaycoastandglens.com/whats-on/rathlin-sound-festival-p828691
-
Welcome back!
-
Long Time! Welcom back!
-
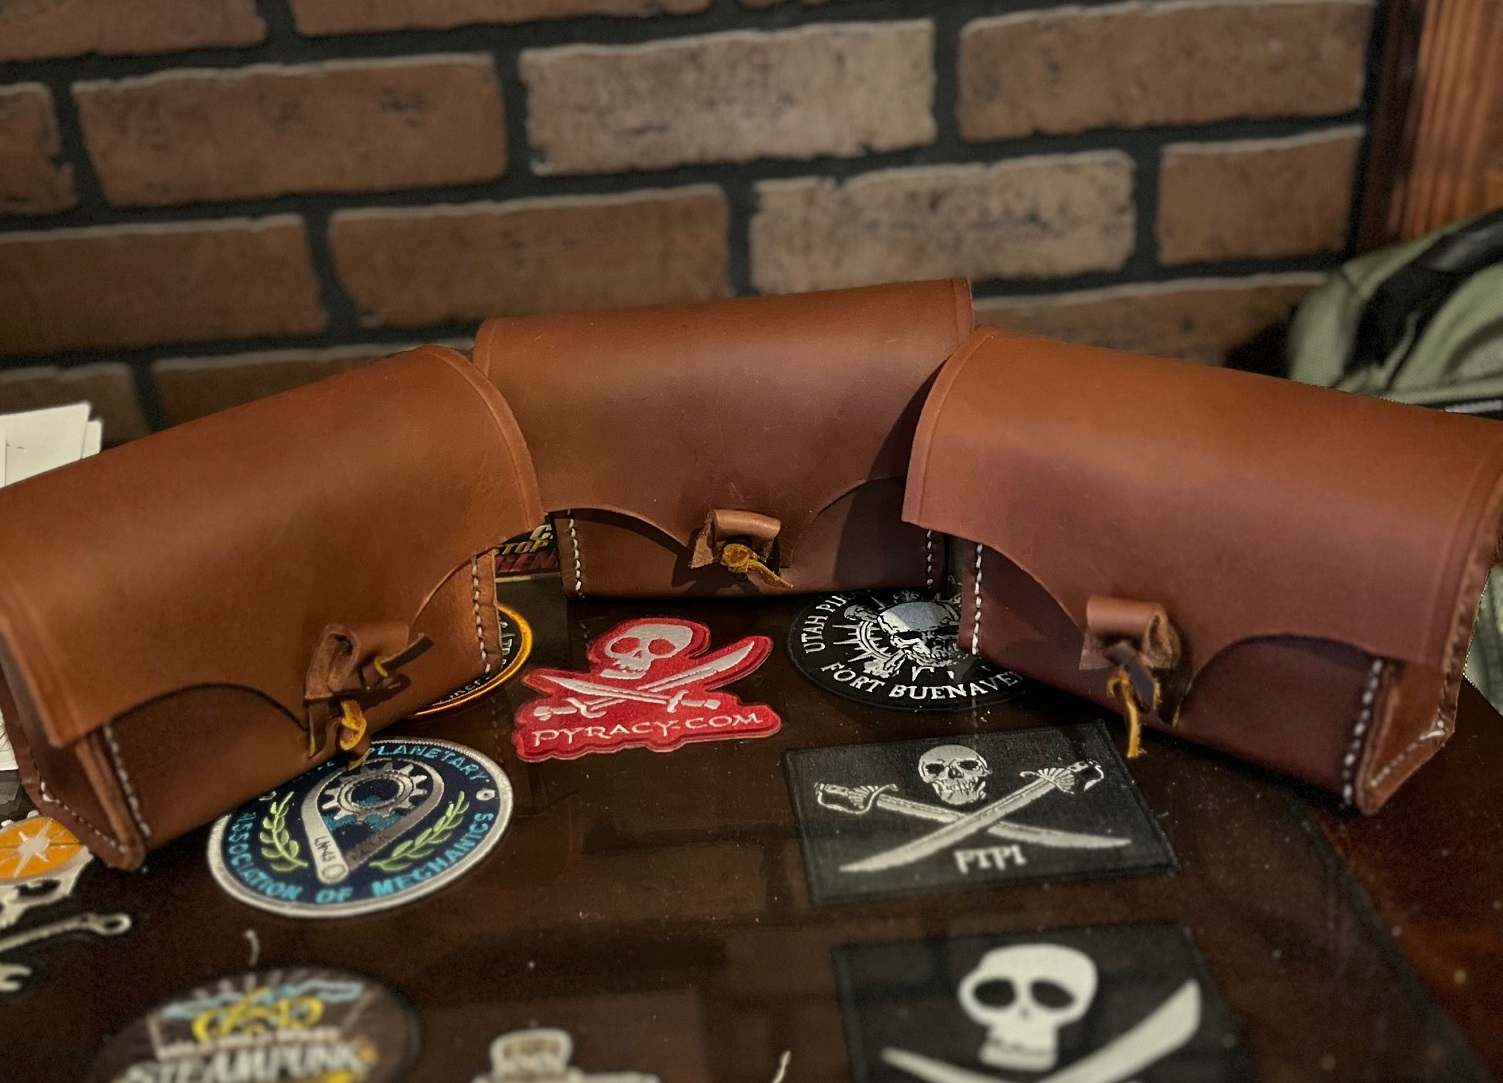
Thanks, I started making them back in 2011ish? At some point I started these inserts, so just finishing up the boxes.
-
I oiled them today and left them in the sun for a couple hours. It tends to darken them up a bit. At this point I'm just testing the waters. I had 6 of the wooden inserts ready to go and sitting around and then a pirate from Ft Gaines prodded me into making some. so here they are. $75 shipped (within CONUS).

-
oar tent is just a diamond shelter with an oar instead of a pole...
-
Over $171,000 raised and donated to the Blood Bank of Alaska so far! A treasure worthy of Alaskans Ranked #1 Pub Crawl in the United States, by TheTravel.com Pirate Cove starting at 2pm - Open during the day. Family Friendly Pirate Pub Crawl starting at 7pm - For Adults over 21. Group Photo kick-off and official Maps will be provided for you at Town Square at 7pm or at any participating pub A2 pm - PIRATE COVE: Visit our pirate vendors and activities earlier in the day - fit for Pirates, Cabin Boys and Girls, Mermaids and Mermen of all ages. Purchase the last minute costume piece or pick up something for your own Pirate Cove back home. 7pm - PIRATE PUB CRAWL: Arrive by 7pm in Town Square, and kick-off the night by joining fellow crews for a photo, then set sail for for all the pubs/ports of call. TO PARTICIPATE: Yes it is free to participate. Pick up a MAP in Town Square or at the first pub you visit - complete the map and turn it in at the last pub you visit and get entered in to a drawing for 80,000 Alaska Airlines miles. Don’t be left on the dock, when there is piratical fun and adventure to be had. DONATE & SAVE A LIFE: A portion of all the funds raised over the day and night will be donated to the Blood Bank of Alaska to help you and your fellow Alaskans in their moment of need. https://anchoragepiratepubcrawl.org/
-
Event by Fernandina Pirates Club Amelia Island Public · Anyone on or off Facebook Avast, ye landlubbers and join yer favorite krewe for ARRRRRRR fourth annual Peg Leg Pete's Pirate Pub Crawl in Downtown Fernandina on Saturday, September 7, 2024! The proceeds from the event will be donated to the three following local charities: - Cross the Line - Cat's Angels - Salvation Army Hope House Please help us support these worthwhile causes. There be a great line up of SEVEN places to fill up on grog, plus chances to get yer hands on some handsome treasure: The Palace The Alley Crab Trap Duck Pinz Gregor MacGregors Hofbrau Amelia Green Turtle A limited number of tickets are available for this event, so make ready yer doubloons. TICKETS ARE NOW AVAILABLE for $40 until the day before the event (or until they sell out) or $45 at the door (unless sold out prior) - DON'T DELAY, or ye might find yerself walkin' the plank! The ONLY way to purchase tickets is through eventbrite: https://www.eventbrite.com/.../4th-annual-peg-leg-petes... Don't be a scallywag, we want to see YOU there! Savvy? ARRRRRR!!! Facebook Event
-
The time draws near once again when The Pirates Of The Canal invites all the pirates far and wide for a night of raiding, pillaging, and charity fun. This year, we are bringing you 4 cover bands for your entertainment: Grungeworthy Rev. Bob Pork Luxe Classic cars (opening for Grungeworthy) There will be a joeys red hots taco/hot dog truck from 9 to 12 for your late night snacking needs. This year, we are also adding a mobile cigar lounge for all you afficionado's out there. While you are there, all 5 of the Captains will be selling raffle prize tickets and 50/50 raffle tickets. Then at 11:30 we will be announcing our raffle winners for the evening. This charity event has no cover to attend, but we ask you to dress in your best pirate costume and come on out and enjoy the charm of the 150 year old smokey row district in downtown Lemont. Though this charity event is free to attend, We ask you to bring whatever money you need to drink, eat, and participate in the evenings events, cash is always best as most bars accept only cash, there are ATM's around town at multiple establishments. We hope to see you there. Participating Establishments: Lemont V.F.W. Post Nicks Tavern Petersons Main inn Matt's Bbq Canal Street Pub Digs on Canal Hughies Tavern One Eleven Wine and Martini bar Toms Place Barrel and Vine Cornerstone Tavern Bottles of Lemont Pollyanna Brewery Next Mex All Proceeds donated to: Hope and Friendship TLC animal shelter #elliestrong Ruby Whiskers Animal Rescue K9's For Veterans Lemont Police Benevolence Fund Lemont Fire Dept Lemont Food Pantries Come on out to help some good causes and get your pirate on. #piratesofthecanal #8thannualpiratepubcrawl #Revolutionbrewing #joeysredhots #95.9theriver Event
-
untilPirate Days Ahoy mateys! St. Peter’s is the place to be for Pirate Days celebrations! So come to St. Peter’s mateys, by land or sea, every September and celebrate Pirate Days with us. Find your inner pirate! But keep your wits about you – you don’t want to be shanghaied! We hope you will join us again fir the annual multi-day event this September with the St. Peter’s community and businesses. There will again be days of fun activities scheduled for all ages. Pirates from far and near have visited over the years and promise to bring even more of their friends for the next one! Get the latest scuttlebutt on the St. Peter’s Pirate Days Facebook page! https://www.stpeterspiratedays.net/ https://www.visitstpeters.com/st-peters-pirate-days/
-
untilThe Picton Maritime Festival is a FREE family oriented event, celebrating the unique maritime heritage of Picton and the Marlborough Sounds. Founded in 2005 the aim of this event is to bring the community together, and to enable our children to learn about the region's heritage in a fun and participatory way. The event also provides a valuable opportunity for family and friends to spend time together without the burden or barriers of having to pay expensive entry fees. The Picton Maritime Festival Committee is currently preparing for its eighteenth annual event in 2024. Each festival entertains around 6000 people. From humble beginnings, it has developed each year into an event which now holds its own place on the calendar. The dedicated group of committee members, are each responsible for specific aspects of the event, from sourcing and securing sponsorship and funding, to set up, operation and picking up that last piece of rubbish when the event is over. We meet on a monthly basis, discussing opportunities for improvement and value to the community, and each go away armed with task lists to complete in preparation. Each of the committee recruits a number of supportive volunteers (many of whom are husbands, wives, partners, children and extended family members) to man and operate their various aspects of the event, guiding, leading, and seeking input for ideas and strategies. Apart from providing opportunities for families to spend valuable time together, and strengthening the bonds within the community, there are a number of other organisations which benefit from either participation in the event or from funds raised. Organisations such as the Picton Volunteer Fire Brigade, Picton Clinker & Classic Boat Club, Papatuanuku Independency Trust, The Cancer Society and Endeavour Park Pavilion Society, have opportunities to raise funds through participation in the event and other groups such as local sports clubs, Picton Kindergarten and Waitohi Playcentre all have opportunities for fundraising and many bank on the opportunity to have a stall at the Maritime festival each year to support their members. Funds raised by the Picton Maritime Festival Trust are subsequently distributed back into the community to support local initiatives for a direct bearing upon local youth and families. In addition to all this, we feel it is also important that the younger generation can see that great things can happen when you set your mind to something. That not everything is about how much you can get paid to do something and that there are huge benefits for the community when you roll up your sleeves and get involved as a volunteer! https://www.maritimefestivalpicton.com/
-
untilFoyle Maritime Festival 2024 The award-winning Foyle Maritime Festival will return to Derry~Londonderry in 2024, from 27th - 30th June. Get planning your stay now! As one of the fastest growing festivals on the Calendar in Ireland, the award-winning Foyle Maritime Festival will return to Derry~Londonderry in 2024 https://www.foylemaritime.com/
-
BOARDED! A New Pirate Adventure presented by San Diego Pirate Adventures, returns for the holidays These popular 90-minute performances are staged aboard the Maritime Museum of San Diego’s 16th century Spanish galleon San Salvador. Guests will be fully engaged in pirate theatrics at the dock and underway on San Diego Bay. Two performances daily Waterfront Playground Experience with Pirates. Guests will set out to San Diego Bay for unforgettable pirate theatrics. Perfect treat for out-of-town visitors and locals alike This hilarious interactive show puts visitors right in the middle of the pirate action. Participants will be sworn in as part of the ship crew, trained how to navigate, sword fight, bail water from a sinking ship, escape from the King’s Jail, swab the deck and other pirate skills. Performances are 90 minutes. https://sdmaritime.org/visit/on-the-water-adventures/otwa-boarded-a-new-pirate-adventure/
-
BOARDED! A New Pirate Adventure presented by San Diego Pirate Adventures These popular 90-minute performances are staged aboard the Maritime Museum of San Diego’s 16th century Spanish galleon San Salvador. Guests will be fully engaged in pirate theatrics at the dock and underway on San Diego Bay. Two performances Daily Waterfront Playground Experience with Pirates. Guests will set out to San Diego Bay for unforgettable pirate theatrics. Perfect treat for out-of-town visitors and locals alike This hilarious interactive show puts visitors right in the middle of the pirate action. Participants will be sworn in as part of the ship crew, trained how to navigate, sword fight, bail water from a sinking ship, escape from the King’s Jail, swab the deck and other pirate skills. Performances are 90 minutes. https://sdmaritime.org/visit/on-the-water-adventures/otwa-boarded-a-new-pirate-adventure/
-
untilThe Castle by Candlelight Old Fort Niagara assumes a particularly festive air during the holiday season. Special activities kick off on Saturday evenings, December 7 and 14 from 6:30 to 8:30 p.m., as the Fort presents The Castle by Candlelight, a tour of the Great Lakes’ oldest building illuminated entirely by candles. Throughout the Castle, visitors will encounter members of the Fort’s 18th century garrison demonstrating everything from quill pens to fur trading to traditional games of skill. Twice each evening the garrison turns out to perform a grand feu de joie (firing of joy), a rolling fire of muskets and cannons. Cooks demonstrate 18th century holiday recipes, musicians play popular songs of the era and a Recollet priest reads the Christmas story in Latin in the Fort’s 298-year-old chapel. Visitors to the event can make a holiday ornament and a bird feeder and enjoy Native American songs and stories. In the fort’s log cabin visitors can warm up and enjoy hot refreshments which will be available for purchase. Menu items include bread pudding, soup, hot chocolate, coffee and tea. https://www.oldfortniagara.org/special-events
-
untilOld Fort Niagara assumes a particularly festive air during the holiday season. Special activities kick off on Saturday evenings, November 30 and December 7 from 6:30 to 8:30 p.m., as the Fort presents The Castle by Candlelight, a tour of the Great Lakes’ oldest building illuminated entirely by candles. Throughout the Castle, visitors will encounter members of the Fort’s 18th century garrison demonstrating everything from quill pens to fur trading to traditional games of skill. Twice each evening the garrison turns out to perform a grand feu de joie (firing of joy), a rolling fire of muskets and cannons. Cooks demonstrate 18th century holiday recipes, musicians play popular songs of the era and a Recollet priest reads the Christmas story in Latin in the Fort’s 298-year-old chapel. Visitors to the event can make a holiday ornament and a bird feeder and enjoy Native American songs and stories. In the fort’s log cabin visitors can warm up and enjoy hot refreshments which will be available for purchase. Menu items include bread pudding, soup, hot chocolate, coffee and tea. https://www.oldfortniagara.org/special-events